
Injection mold making is the cornerstone of modern plastic production, an essential process for creating the high-quality, repeatable parts that shape our world. From complex automotive components to everyday consumer goods, injection molding delivers efficiency and scale. As market demands intensify, the need for faster, more cost-effective mold manufacturing solutions has never been greater, pushing innovation in rapid tooling and on-demand services.
This guide breaks down the critical aspects of how to create a mold, exploring the step-by-step process, the materials to make a mold, and the factors that drive costs, so you can make informed decisions for your next project.
What Is Injection Mold Making?
Mold making, also known as tooling, is the highly specialized engineering discipline of designing and fabricating the mold itself. This is a distinct, upfront process performed by expert toolmakers using precision machinery.
This should not be confused with injection molding, which is the high-volume manufacturing process that uses the finished mold to produce parts. The molding process involves injecting molten material into the mold, where it cools and solidifies into the final product.
Think of it this way: mold manufacturing is like building the ultimate waffle iron (the tool), while injection molding is the act of using that iron to make thousands of identical waffles (the parts). The quality of the iron dictates the quality of every single waffle, making the initial mold making stage the most critical step in the entire production chain.
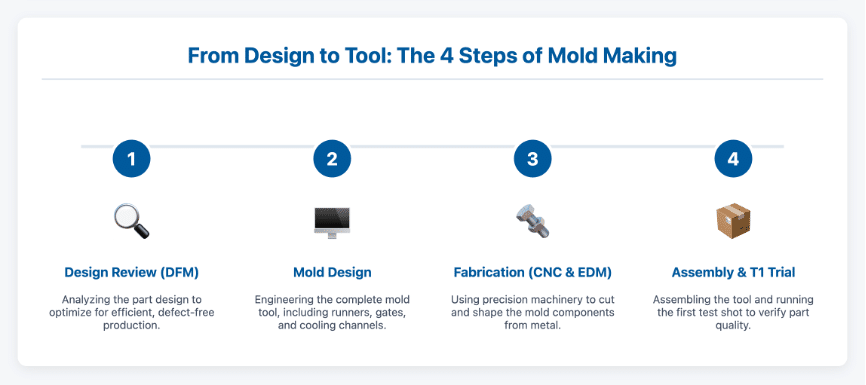
The Injection Mold Making Process: Step-by-Step
Creating a high-quality injection mold is a systematic process that transforms a digital design into a robust manufacturing tool. It involves careful planning, precision engineering, and rigorous testing.
Step 1: Product Design Review
Before any metal is cut, the process begins with a critical design review guided by the principles of Design for Manufacturability (DFM). DFM is a proactive analysis aimed at optimizing the part design to make it easier, faster, and more cost-effective to produce. This collaborative step between designers and engineers identifies potential manufacturing defects before they become expensive problems. Key DFM considerations include:
- Uniform Wall Thickness: This is the single most important rule. Consistent walls ensure the part cools evenly, preventing defects like warping and sink marks.
- Draft Angles: A slight taper (1-2 degrees) is added to vertical walls to allow the part to be ejected smoothly from the mold without scratches or drag marks.
Step 2: Mold Design
Once the part design is finalized, engineers design the mold tool itself. This is a complex assembly of several key components:
- Core and Cavity: These are the two halves of the mold that come together to form the hollow shape of the final part. The “A-side” (cavity) typically forms the cosmetic exterior, while the “B-side” (core) forms the internal, functional features.
- Runners and Gates: This network of channels delivers molten plastic from the molding machine’s nozzle into the cavity. Gates are the specific entry points into the part and are designed to control flow and detach cleanly after molding.
- Cooling System: A network of channels is drilled into the mold plates to circulate coolant (usually water) to remove heat efficiently. Cooling is the longest part of the molding cycle, so a well-designed system is critical for both part quality and profitability.
Step 3: CNC Machining and EDM
With the mold design complete, toolmakers begin the physical fabrication using a combination of complementary technologies:
- CNC (Computer Numerical Control) Machining: This is the workhorse of mold making. It’s a subtractive process where computer-controlled cutting tools carve the mold’s core and cavity from solid blocks of steel or aluminum. It’s used for bulk material removal and shaping the primary components.
- EDM (Electrical Discharge Machining): Also known as spark machining, EDM uses electrical discharges to erode metal, creating features that are impossible with traditional cutters. It’s a specialist process used for sharp internal corners, deep ribs, and fine surface textures.
Step 4: Mold Assembly and Testing (T1)
After machining, the mold components are polished, assembled, and tested in a process called a mold trial. The T1 trial is a key milestone where the first sample parts are produced and sent to the customer for evaluation. It is normal for T1 samples to require minor adjustments. Based on customer feedback on fit, function, and appearance, the toolmaker makes precise refinements to the mold to dial in dimensions and perfect the final part.
Materials to Make a Mold: What Are They and How to Choose
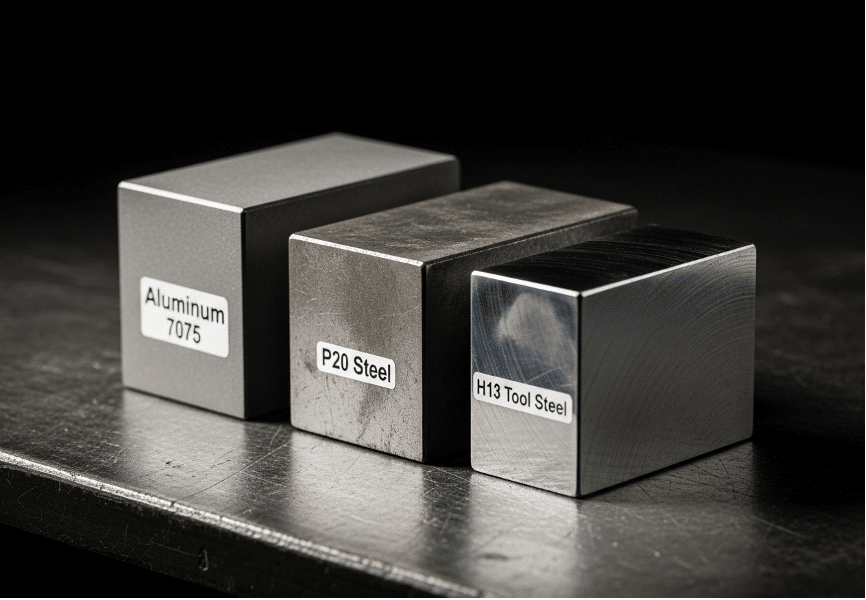
The choice of mold material is a strategic decision that balances durability, cost, and production volume. The most common materials to make a mold include several grades of steel and aluminum.
- P20 Steel: A versatile, pre-hardened steel that offers a good balance of machinability and toughness. It’s a cost-effective workhorse ideal for prototypes and low-to-medium volume production runs (typically up to 100,000 cycles).
- H13 Steel: A very hard and durable tool steel that can be heat-treated for superior wear resistance. H13 is the standard for high-volume production (250,000 to 500,000+ cycles) and is necessary when molding abrasive, fiber-filled plastics.
- Aluminum: Often used for prototype and low-volume “rapid tooling” (under 10,000 cycles). Aluminum is much softer and can be machined faster and cheaper than steel, making it perfect for quickly creating test parts. However, it lacks the durability for high-volume runs.
Factors to Consider:
When choosing a material, consider these factors:
- Volume of Parts: How many parts will the mold need to produce in its lifetime? A mold for 1 million parts requires a much more durable (and expensive) steel than a mold for 5,000 parts.
- Molded Part Material: Abrasive resins with glass or carbon fiber will quickly wear down a soft mold. Hardened steel like H13 is required to withstand this wear.
- Cost vs. Durability: While an aluminum mold has a low upfront cost, it’s a poor investment for high-volume production. Investing in the right steel from the start prevents costly repairs and production downtime later.
Cost of Injection Mold Making: What Affects the Price
The cost of an injection mold can range from a few thousand to hundreds of thousands of dollars. The price is driven by several key factors:
- Part Complexity and Size: This is the biggest driver. Larger parts require more material and machine time. Complex geometries with undercuts (features that prevent the part from being ejected) require expensive mechanisms like sliders and lifters.
- Mold Material: Hardened tool steels are more expensive than P20 steel or aluminum.
- Number of Cavities: A mold can have one cavity (producing one part per cycle) or multiple cavities. A multi-cavity tool has a much higher upfront cost but significantly lowers the per-part price, making it economical for high-volume production.
- Tolerances and Mold Life: Tighter part tolerances demand more precise machining and higher-grade steel. Likewise, a mold built to last for a million cycles must be made from more robust and expensive materials than a prototype tool.
A cheap mold is often the most expensive choice in the long run. Poor construction or inadequate materials can lead to defects, frequent repairs, and production delays, quickly erasing any initial savings.
Partner with HordRT for Faster, In-House Mold Manufacturing
Navigating the complexities of mold making is easier with the right partner. At a full-service manufacturing provider like HordRT, the entire process is managed under one roof. HordRT’s in-house mold manufacturing capabilities provide a significant advantage, streamlining project management from DFM and mold design to mass production. This integrated approach ensures better quality control, accelerates timelines, and offers a single point of accountability for a seamless and successful product launch.
Conclusion
Effective injection mold making is a blend of science, technology, and strategic decision-making. The success of a high-volume plastic part is determined long before the first shot of plastic is injected. It hinges on a commitment to Design for Manufacturability, the strategic selection of mold materials, and a clear understanding of the trade-offs between cost, speed, and quality.
While the process is complex, you don’t have to navigate it alone. Choosing an experienced manufacturing partner simplifies the journey, mitigating risks and ensuring your investment in tooling delivers a high-quality product and a strong return for years to come.